Step 1. Bid strategies: choose a goal and stick to it
Campaigns start with a goal. You might need quick traffic for testing, leads at a target price, or revenue with a set return. Each task has a suitable strategy. Many make the mistake of enabling smart bidding too early, without data, which leads to swings in CPC and conversions.
At the start, Maximize Clicks or Maximize Conversions will do if tracking is already set up. For Maximize Clicks, be sure to set a CPC cap. After 30–50 conversions within a campaign, it makes sense to switch to Target CPA or Target ROAS. For branded queries and visibility control, Target Impression Share is useful with a CPC limit.
Before choosing a strategy, check conversion tracking. Events must match business goals, the attribution window should reflect the decision cycle, and priorities need to be set correctly. The daily budget also matters; too low breaks learning, too high reduces control.
Give the strategy time to stabilize. One or two weeks without sharp changes is usually enough. This way the model gathers data and stops bouncing between audience segments.
Step 2. Automated rules: move the routine to autopilot
It’s better to automate repetitive tasks. Pauses, bid adjustments, turning promotions on and off on a schedule, safety alerts these are easy to set up with basic rules. The result is hours saved and a lower risk of random errors.
Before rolling out, label entities. That way a rule triggers only where needed. Add email notifications to see every trigger. Test on a small group, then scale up. Set safety thresholds in conditions, such as an upper limit on bid changes.
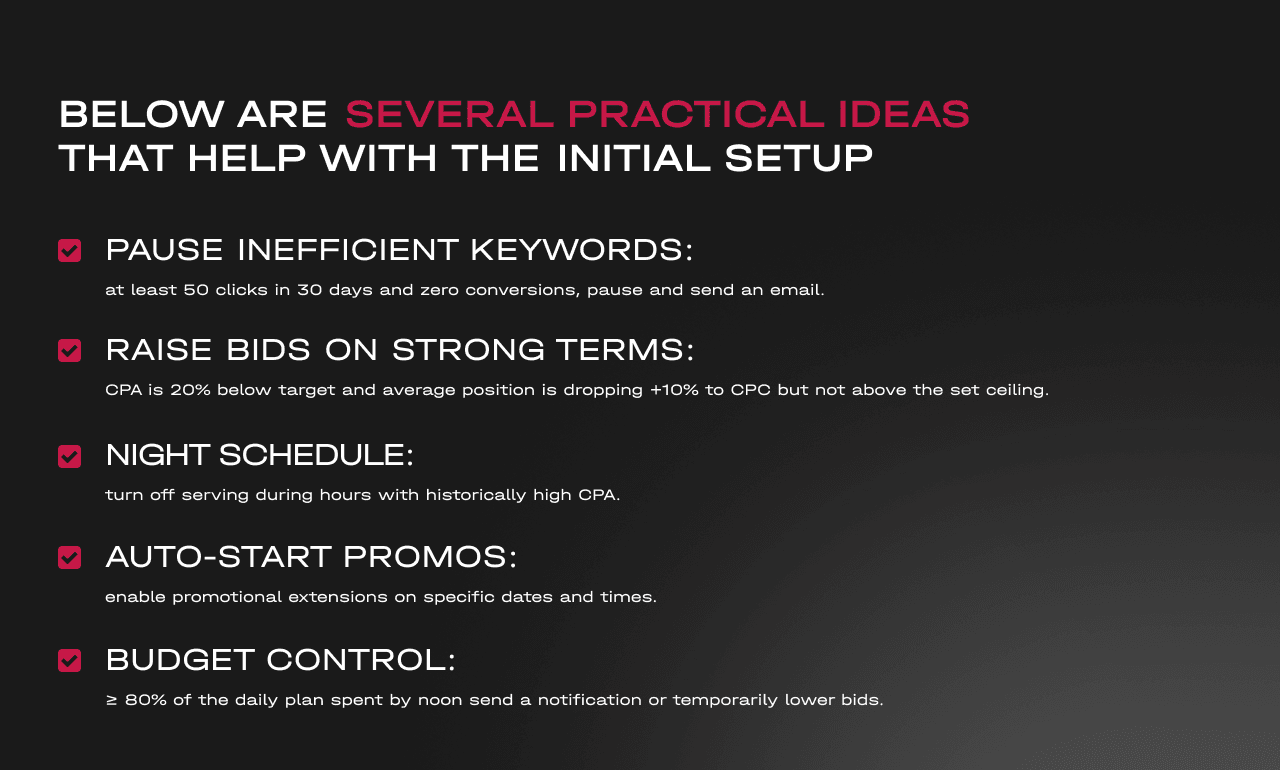
Below are several practical ideas that help with the initial setup.
Pause inefficient keywords: at least 50 clicks in 30 days and zero conversions, pause and send an email.
Raise bids on strong terms: CPA is 20% below target and average position is dropping +10% to CPC but not above the set ceiling.
Night schedule: turn off serving during hours with historically high CPA.
Auto-start promos: enable promotional extensions on specific dates and times.
Budget control: ≥ 80% of the daily plan spent by noon send a notification or temporarily lower bids.
After setup, review the trigger log weekly. If rules have become too strict or too soft, update the conditions. This keeps the system helpful without blocking growth.
Step 3. Google Ads scripts: flexibility where rules aren’t enough
Sometimes basic rules aren’t enough. You need link checks, even budget pacing, complex conditions for search terms, and automatic ad rotation. Scripts are right for such tasks.
It’s best to start with templates. Label entities, set limits, and run a preview to see planned changes. Keep a log in a spreadsheet; it simplifies audits and rollbacks. Build safeguards into scripts themselves for example, a maximum number of pauses per day and a cap on bid changes.
Below are examples that cover frequent account needs.
Even budget pacing: spend is distributed by day across the month, factoring in underspend/overspend from the previous day.
Automatic negative keyword fill: the system collects recurring irrelevant queries and adds them to a shared list.
Landing page checks: response code, redirects, quick auto-pause for ads with a broken URL, and an email to the owner.
Ad rotation: even impression share for variants and disabling weak ones after reaching a significance threshold.
Feed reconciliation: price and availability checks for Shopping and dynamic campaigns, with insertion of current values.
After implementation, define a schedule. Daily checks suit links and budget, weekly checks suit ad rotation, monthly checks suit search term cleanup.
Step 4. Negative keyword lists: protect the budget from unnecessary impressions
Negative keywords cut out irrelevant traffic and improve click quality. The work follows a cycle: collection, grouping, application, review. Don’t overdo it, so you don’t lose valuable queries, especially with broad match negatives.
The main sources are straightforward. The search terms report shows how people actually speak, CRM reveals markers of unqualified leads, and semantic clusters help maintain tidy lists. It’s convenient to separate lists by level of application.
Before the list, a quick reminder on structure: a global file for all campaigns and themed sets for specific lines.
Match types: exact for pinpoint blocking, phrase for inclusions within queries, broad used carefully.
List layers: global, product-level, and a separate layer for branded cases if needed.
Cadence: weekly review of new terms and monthly pruning of old tails with weak metrics.
Morphology: add inflections and common typos visible in the search terms report.
After a review, watch seasonality. Before major sales, many queries change meaning; some previously weak terms start to convert. During peaks, relax filters; after the campaign, restore prior constraints.
Step 5. Ad copy on autopilot: more tests without chaos
Copy affects CTR, quality, and conversions. Responsive ads make testing easier and let you scale creative quickly. It’s convenient to keep one responsive format per ad group with a clear, tight keyword theme.
Pin key elements. You can fix the main offer to a position while other headlines and descriptions rotate. Enable extensions sitelinks, callouts, structured snippets, phone numbers, addresses. The snippet looks more convincing and takes up more space.
Below are basic rules that keep analysis simple and drive growth.
Relevance: keywords and copy should align in meaning, which lowers CPC and improves quality.
Specifics: price, timing, guarantee, benefit the clearer the message, the higher CTR and conversions.
A/B discipline: change one major element per test and set impression/click thresholds for decisions.
Post-click: page speed, clear structure, short form, visible trust signals.
After launch, keep a hypothesis log. Note what changed and why, and the outcome. This speeds up team learning and saves budget.
Step 6. Placement exclusions: clean inventory and brand protection
The Display Network and YouTube provide reach, but some placements don’t convert or hurt image. Exclusion lists by URL, channel, and topic help maintain quality. Another layer of control is devices and apps.
Start with a base blocklist and sensitive categories. Apply lists at the account level so new campaigns launch with clean inventory. Review the placements report weekly, cut sites with spend and no leads, and add them to the shared file.
Before the list, a short note: check each exclusion over the last 30–60 days so you don’t cut performing segments.
Placements: URLs, channels, and specific videos where traffic brings no leads or doesn’t fit the brand.
Content categories: remove sensitive topics if the audience doesn’t match your target.
Topics and interests: remove segments that consistently perform poorly on leads.
Devices and apps: limit mobile games and placements with accidental clicks if metrics worsen.
After implementation, add two reports to the dashboard. One for spend and conversions by placement, the other by device. A daily glance is enough to catch anomalies before overspending.
Step 7. Data visualization: dashboards for fast decisions
Data is useful when it’s visible without long filtering. Custom column sets and filters in the interface speed up daily checks. Segments reveal patterns by geography, device, and time, and the report builder assembles handy summaries.
Assemble a single screen for key KPIs: spend, conversions, CPA or ROAS, impression share, search terms, extension performance. A separate Looker Studio dashboard works for leadership. It’s convenient to add trends, deviation thresholds, and alerts for sharp changes.
Below is a basic control rhythm that keeps the system in shape:
Daily: budget, sharp deviations, strategy learning status.
Weekly: search term and placement reports, bid and audience adjustments.
Monthly: goal review, budget reallocation, return assessment.
After setup, enable anomaly alerts. An email on a CPA spike or conversion drop often saves you on weekends and holidays.
Mini checklist for launch and optimization
A short memo helps you remember the key steps before scaling. Go through the items after the first week of work and before major changes. This reduces the risk of random failures and unnecessary spending.
Keep the checklist next to the dashboard and tailor it to the niche. Assigning owners to items speeds up response because it’s clear who handles the task and by when.
Below is a list suitable for most projects:
Goals and conversions: events align with business objectives, attribution reflects the real cycle, priorities are agreed.
Bid strategy: matched to the stage, limits and caps set, learning period considered.
Structure: campaigns and ad groups are logical, ads are relevant, extensions are filled out.
Negative keywords: global and themed lists are connected, a review schedule is set.
Rules and scripts: routine operations are automated, notifications and safeguards are in place.
Placement exclusions: blocklist applied, sensitive categories disabled, reports added to monitoring.
Reports and dashboards: column/filter presets saved, alerts enabled, Looker Studio connected.
After going through the list, schedule another review in two weeks. This cycle maintains order and helps catch hidden issues.
Common mistakes and quick fixes
Mistakes repeat from project to project. Usually the problems are an early switch to Target CPA/ROAS without sufficient history, over-aggressive negatives, endless ad edits without statistics, no schedules, and a weak landing page.
Knowing the traps makes it easier to stay on course. Don’t change everything at once. Fix one area at a time and record the effect. That way you see the impact of each change, and the budget doesn’t suffer from extra moves.
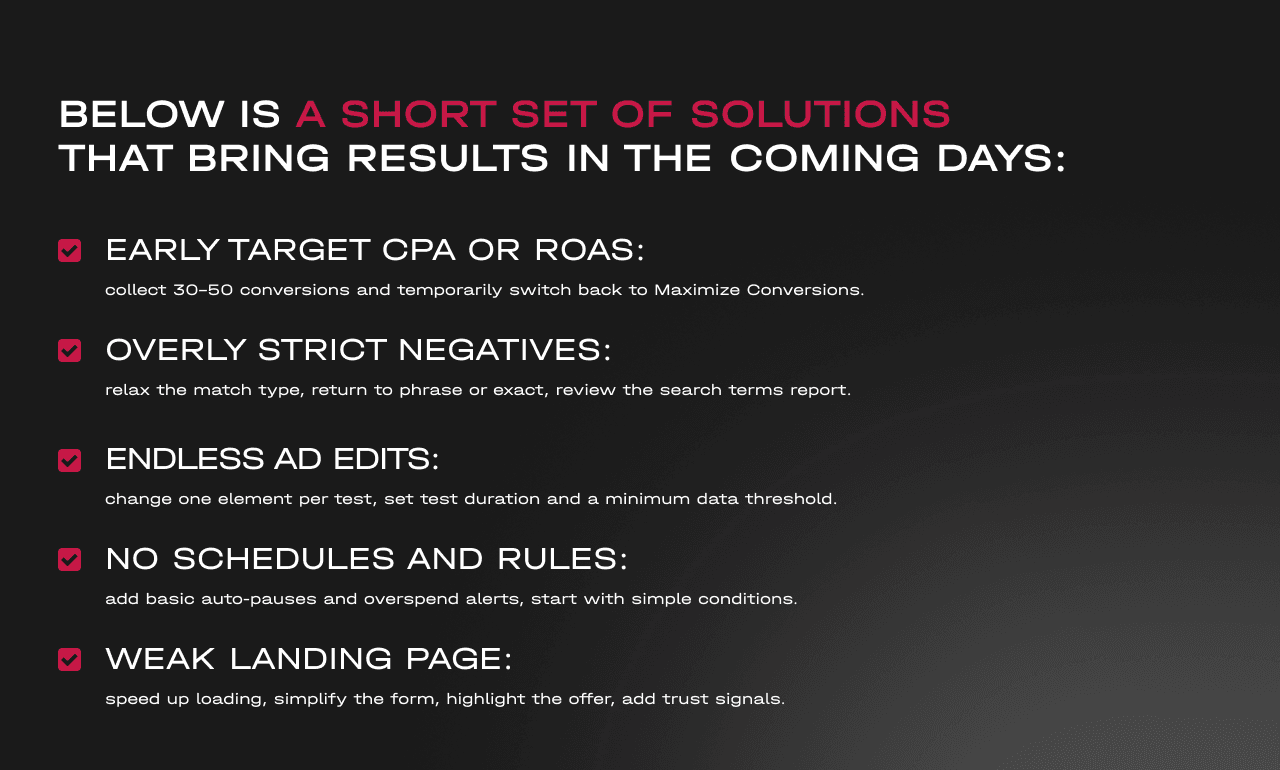
Below is a short set of solutions that bring results in the coming days:
Early Target CPA or ROAS: collect 30–50 conversions and temporarily switch back to Maximize Conversions.
Overly strict negatives: relax the match type, return to phrase or exact, review the search terms report.
Endless ad edits: change one element per test, set test duration and a minimum data threshold.
No schedules and rules: add basic auto-pauses and overspend alerts, start with simple conditions.
Weak landing page: speed up loading, simplify the form, highlight the offer, add trust signals.
After implementation, give it a week and evaluate the metrics. If there’s improvement, lock in the new rule. If not, roll back and try the next step.
Conclusion
Effective campaigns rely on discipline and clear goals. First, choose a bid strategy for the task, then enable rules and scripts, then clean traffic and run focused copy tests. Visualization helps see the big picture and spot errors quickly. This order lowers CPA and makes results predictable
The second pillar is transparent analytics and a steady cadence. Dashboards show key metrics on one screen, alerts catch anomalies, and the checklist fixes the sequence of actions. When all elements work in sync, campaigns grow without extra fuss or stress.
Sign up on https://revenuelab.biz/ and choose the best campaigns for different traffic sources today.